Marlin photography
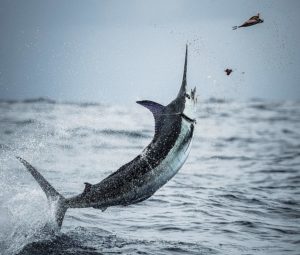
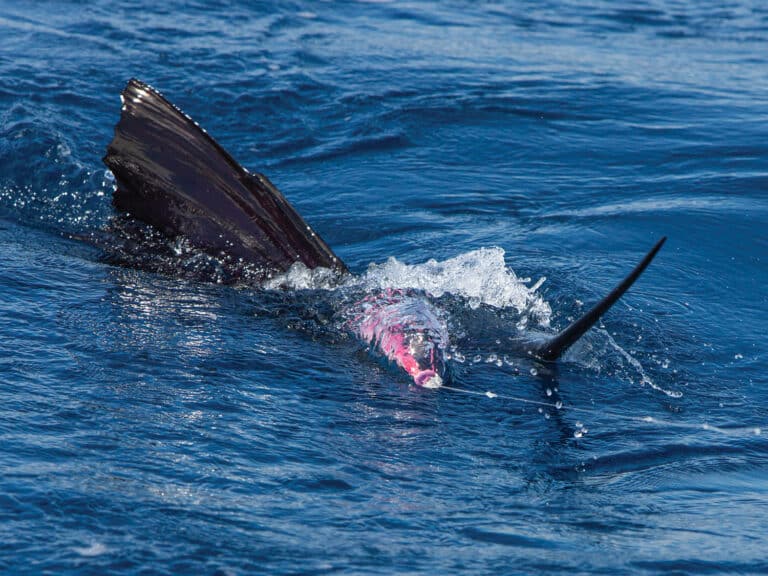
I’m sure any avid sport fisherman would agree that we spend some of the most exciting days of our lives standing on the deck of a boat several miles out to sea. We get back to the dock and try to communicate these experiences to friends and family, only to be given that look. It’s one of those “you had to be there” things. I tend to put it in the “if I have to explain it to you, you wouldn’t understand” bucket and let it go. After all, how do you explain the sight of a blue marlin crashing the left long, its whole back out of the water, leaving a crater filled milliseconds later by an explosion of white water? How do you describe the colors of a lit-up sail slashing at the squid chain or swimming away from a good release?
Let’s face it. Unless you are Zane Gray or Ernest Hemingway, you don’t. Film cameras with the expensive, low-quality video of a few years ago never did these cockpit battles justice. Unless you had a dedicated photographer on board, you relied on a grainy 4-by-6 glossy print several weeks after the event to prove your catch or, even worse, a TV screen displaying a distorted, interlaced, chromatic aberration, which, when paused for maximum effect, turned into nothing more than a flickering mess of indistinguishable pixels.
I’m here to tell you that times have changed. A sea of high-resolution options at home both above and below the water now lay before you, and some are priced lower than a tank of gas. With all the camera and video options out there, now the problem is choosing which system we need for the type of boat we’re on and the kind of fishing we’re doing. During this basic overview, I’ll add some ideas to the hardware tips to help improve your visuals with simple shooting techniques and explain how, in just a few steps, to transform the raw camera footage into something you can share online, to the amazement of family and friends.
Which Camera Should I Get?
Trying to give advice about camera equipment brings to mind the age-old question “How long is a piece of string?” The answer: It depends. In the space of this article, I won’t be able to answer every possible camera question, but I would like to leave you with several options to film the fishing action on your boat that you can share with your friends and — who knows — maybe a few thousand other couch anglers online.
The biggest revolution in camera technology that affects sport fishermen is the point-of-view, or POV, camera. POV cameras are best described as very small cameras used to capture the view of the person controlling them. One camera in particular has dominated this trend and has been used to capture footage from more angles and in more environments than ever thought possible: the ubiquitous GoPro series (gopro.com). Now in its third iteration, this pocket-size camera produces incredible, high-definition (HD) images. This is a good place to start with the first batch of technical info: What exactly does HD mean?
We first need to understand how an image is created. When you look at any sort of screen, what you are actually seeing is an image made up of thousands of little dots called pixels. Basically, the more dots on the screen, the sharper and clearer the image looks. The number of dots is the image’s resolution. HD has more dots, or a higher resolution, than standard definition (SD). Any image with more than 720 horizontal lines of dots is generally considered HD. The two most common HD formats are 720 and 1080. These can then be interlaced, which saves time by showing only half the number of lines from one frame interlaced with the lines of the next frame. This fools your eye into thinking that you are seeing the whole image, but in fact you are only seeing half the frame at any one time. The better format option is called progressive, which shows one complete frame at a time, producing a better-quality image and giving a different feel to the footage. Interlaced and progressive formats are indicated by either an “i” or a “p” after the lines of resolution (for example, 1080i or 1080p).
Almost all cameras available today are HD, having more than 720 lines of vertical resolution. In fact, most will be 1080, and the best ones are 1080p. It’s important to keep in mind that if you are going to burn your videos to a DVD using a standard burner, the maximum resolution is just 480 vertical lines, which is well below HD. Only a Blue Ray burner will give you true HD, with 1080 lines.
Point of View
If you are just starting out and have a relatively small budget, POV cameras are the best place to begin. These small cameras have several features that make them ideal for use in a fishing-boat environment. Most are fitted with a wide-angle lens, which provides several benefits. A wide-angle lens gives an expansive view, even inside the confines of a center-console’s gunwales, which means that you can get up close to your subject and still see what’s going on around it. The wide lens also provides you with a massive depth of field — a technical way of saying that almost everything in front of the camera, from several inches to the farthest horizon, will be in focus. The wide lens is also perfect for use underwater, where we need to get close to our subject for the clearest and most color-saturated results.
Another benefit to fixed-focus POV cameras is that their exposure is controlled automatically, so an understanding of photographic exposure controls isn’t necessary.
They also come with several menu options to shoot video, still images, time-lapse sequences and more. Under each of those modes, there are further options to change frame rates. When it comes time to edit your final film, increasing the frame rate from the standard 24 frames per second to 60 frames per second gives the option of slowing down the action into slow motion. Be aware that when you increase the frame rate, the camera will automatically lower the resolution of the footage.
POV cameras also come with an endless array of accessories to help you get the shot, from chest mounts to capture the action on the angler or wire man to pole mounts for the riggers or rocket launchers. My personal favorites are the sucker mounts, specifically those made by Sea Suckers. With these devices, you can mount the camera just about anywhere you can find a smooth surface. I got some really fun shots, with one stuck to the transom facing a short flat line.
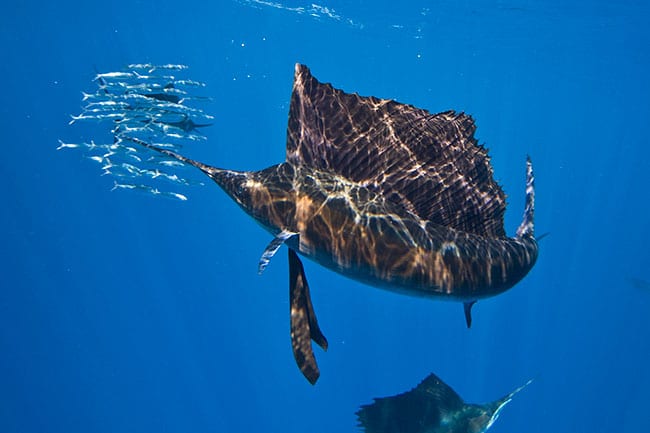
If you want to get up close and personal with the fish in the water, try a TrollPro housing on your camera, which allows you to troll a GoPro underwater in front of a lure or teaser or inside a dredge. This provides incredible underwater footage of fish in the spread — even fish you didn’t know were there! Don’t be scared to try new things with these POV cameras. Put them on the end of poles to film a fish release from underwater, on the end of a tag stick or even on a helmet facing back at the angler for a really wild view of the world. New accessories and firmware upgrades are making these tiny cameras an essential tool, even for pro filmmakers.
The new GoPro HERO3 comes complete with an underwater housing that will focus both above and below the water. A dive housing purchase is required to use older-model cameras underwater, as the older housings do not focus correctly underwater. Also available is an LCD display that fits onto the back of the camera and acts as a small screen to show you what the camera is recording. This is handy as a setup tool when mounting the camera to see what it’s recording. Other hardware add-ons include a wireless control system. This can be run from a handheld trigger or wirelessly from your smartphone. It beams back a live view of what the camera is seeing and allows you to start and stop video or take still images.
The GoPro represents just one of the small POV options. Other companies manufacture small HD cameras, such as the Sony HDR-AS15 Action Cam, which comes complete with a waterproof housing.
Point-and-Shoot Digital
If you are looking for more control over your images with more options, there is a great range of compact digital cameras, more commonly called point-and-shoot cameras. These all have an option to shoot HD video, as well as still images. These cameras will give you more flexibility to control how the image looks and give you lens options via a built-in zoom lens, from wide-angle big views to zoomed-in longer-focal-length options to reach out and grab the action.
A lot of manufacturers are now making relatively inexpensive underwater housings for point-and-shoot systems, which are perfect for the boat. Just remember, do not take an unprotected camera anywhere near an angler or captain while backing down on a fish. Everything seems just fine until that one wave or unintentional elbow either knocks the camera from your hand or swamps it.
If you must, put the camera in a Ziploc bag to protect it from spray, pull the bag tight over the lens, and hold it there with a rubber band. This reduces the quality of the images, but your camera will last longer.
From the point-and-shoots, we approach — and sometimes exceed — the $1,000-mark, and enter a new camera realm: the mirrorless interchangeable lens camera, or MILC for short. These cameras and their new technologies have revolutionized consumer photography and videography.
I’ve used cameras from this range, which blow away the visuals I shot even five years ago on professional gear that cost tens of thousands of dollars. These midrange cameras are characteristically small, and have different adapters and lens options, which make them compatible with professional lenses. They have fully automated functions and most have the same manual controls used by the pros. This becomes important if you start really getting into photography or video, as you won’t outgrow these cameras too quickly.
Examples of these midrange MILCs are the Sony NEX-7, Nikon 1 J1 and Canon EOS M, just to name a few. Your pockets need to be deeper with this range, because with the optional interchangeable lenses comes the desire to buy different lenses to fit different situations, like a wide angle for use in the boat and a long lens to capture a fish’s jumping action. The other expensive parts of these systems are the third-party dedicated underwater housings, which are sometimes more than twice the cost of the camera itself.
The last group of cameras is the digital single-lens reflex camera, or DSLR. These are the larger, more versatile big-camera bodies and lenses used by the pros. I’m not going to spend too much time on this group. If this is the part of the market that interests you, you are going to need a substantial financial commitment, and I recommend the advice of a professional before spending this type of money on a camera.
The cameras I’ve discussed, except for the small POVs, are primarily still cameras with great-quality HD video as an option. There is a wide range of dedicated video cameras made primarily for shooting video that have a basic still-image option as well. I would only head down this road if you are certain that video is your main focus, rather than a bit of both. These cameras are designed around video, with features like constant autofocus while recording (something lacking on most of the still cameras); higher-quality external microphones for better location sound; and they normally come with the handles and grips designed for steadier video shooting. These cameras range in price from around $150 for the most basic to hundreds of thousands of dollars for professional super-high-resolution cameras.
One last thing about gear: Don’t forget your smartphone. New phones are coming out that not only have great cameras, but awesome apps to help you use them. If you are going to use your phone on the boat, get a waterproof case, such as those made by LifeProof (lifeproof.com) or Optrix (optrix.com).
Using Them
So far we’ve covered gear. Now here’s where the rubber meets the road: actual shooting. Any tips must be split between stills and video, because both are so different. As for video, there are some basic tips that can go a long way toward making your clips more enjoyable.
Always think about what it must be like for someone else to watch what you have shot. Making people seasick in front of their screens is not what you want to do. Video rule No. 1: Keep the camera steady. A camera waving all over the place is not conducive to producing something worth watching. Think of your arms, waist and legs as gimbals that move, counteracting the rock and roll of the boat while keeping the camera dead still, much like a waiter with a tray of glasses dodging patrons in a crowded dining room. The tray always remains steady and level, even when the waiter rushes between obstacles.
Next, keep the camera level with the horizon. Think about the natural movement of your head. It’s pleasant to survey your surroundings by moving your head slowly from left to right or right to left; it’s even fine to look up and down slowly every so often, but what is not natural is rocking your head from side to side. The same applies to the camera. Keep the horizon steady and pan the camera horizontally or tilt it vertically, very slowly. Never let it yaw from right to left. So what about when the boat is rocking? In rough sea, use the deck or running boards of the boat as your level horizon. Always move the camera slowly, never in short or sharp jerking movements.
Use a wide-angle lens, like those on the small POV cameras, to get up close to everything. Due to a phenomenon called forced perspective, subjects even five feet away will look tiny, while subjects within a foot of the lens will look huge. When shooting video on a boat, avoid long focal length lenses that capture images at a distance. These lenses are perfect for a still camera when trying to get those jumping shots, but on a rocking boat while shooting video, using them is like trying to follow a football game looking through a 10-foot-long, 2-inch-wide cardboard tube. They just don’t work.
Keep your camera covered or in its underwater housing, even on the calmest of days. Make sure you have plenty of charged batteries and extra memory cards on hand — you’d rather shoot too much video than not enough.
Editing
This brings me to the final part of this overview: what to do with the great footage once you have it. This is where most epic fishing cinema graphic intentions come to naught. We must find a way to share the great stories we have recorded with our friends. And therein lies the secret: the stories. Just like any good story, no matter how long or short, it has to have a beginning, a middle and an end. You do this with editing. During editing, we take out the bits we don’t need and put the parts we want to show in the right spots, in an order that makes sense and tells the story without requiring you to narrate it.
Editing the footage is where most people fall down. The majority of all video shot remains lost on a memory card until accidentally deleted to make room for more. Clips that don’t seem important at the time, but for so many reasons become important later, are erased, and later the person regrets it. A bit of time and organization is all it takes to avoid this.
First, purchase a dedicated external hard drive for your computer. They are incredibly cheap these days. Don’t go saving all your video on your computer’s main drive unless to want everything to grind to a halt pretty quickly; video needs a lot of space. A dedicated hard drive will keep things in order.
Save all your videos — even if you have no intention of editing them right away. You never know when you might need something from a previous trip.
Buy some editing software. Don’t go nuts and buy the professional stuff right off the bat; you will only twist yourself in knots trying to understand it. Start with something like iMovie if you have a Mac or Pinnacle if you have a PC. There are plenty of options out there. There are also more intermediate packages like Final Cut Express and Premier Elements, which will help you and offer a bridge to the more professional versions of the software later. If I can give you any advice here, it’s to start simple.
One last piece of wisdom: Sign up for some training online with a company like lynda.com. A few tutorials will go a long way to producing an expert-looking edit within a few hours. It really is easy once you give it a go; just remember to tell the story from start to finish.
Once the video is edited and ready for global release, register with a video-streaming channel like YouTube or Vimeo. There you can upload your stories and share them privately with friends or, by sharing the links on social media or relevant blogs and forums, with the world.
Going Over
More and more people are jumping overboard to film the action from the water. (This is the “don’t try this at home” part.) The Internet is flooded with exciting, great-looking video shot from underwater while swimming around the boat. First of all, be warned that a lot of things can go wrong when jumping over. This is not something to be done without experience and without the full knowledge of how dangerous it can be. Don’t just go bailing off the boat. Talk to, or spend time with, someone who has experience working from the water around big fish, sharks and spinning propellers. Having said that, I believe that, when approached the right way, there are few experiences that can beat floating near a baitball of sardines while more than a dozen marlin or sailfish tear through it while your camera rolls.