brightwork shine
Back in the day, just about every boat came with a coat of varnish, some brightwork and tons of paint. Even in the early days of fiberglass boats, manufacturers usually trimmed them out with teak or mahogany accents. Today’s fiberglass rigs may not require any varnish or paint, but they still need upkeep, like constant cleaning and waxing, to help maintain their value. The process to maintain varnish is very similar.
Most of today’s finer custom boats come with varnished teak toe rails, bridge caps, half rounds, transoms and cockpit bulkheads. I’ve been working on boats with a lot of brightwork for more than 30 years. I prefer the traditional upscale look and warmth that wood adds to a boat, and when maintained correctly, it’s only a little more work and expense than waxing fiberglass regularly.
The Right Tools
A quick walk down the dock can usually tell you which boats are dialed in and which ones are not as up to par. Using the right products is paramount to getting the results that the pros do. Like any job, using the proper high-quality tools makes for a good outcome — and usually makes it much easier as well. To tackle any brightwork project, you’re going to need good-quality masking tape, razor blades, 3M green pads, sandpaper, tack cloths, denatured alcohol, clean rags, clean quart pots, strainers, good brushes and a good-quality varnish or paint product.
Taping
Regular old brown masking tape, which has so many good uses, does not work on the boat. It doesn’t have the necessary qualities to handle the sun and weather conditions typically encountered when working on a boat’s brightwork. We use 3M green tape, which gives us a good, crisp edge and lasts for several days of working time. It is important when taping to have a clean, dirt-free surface that the tape can stick to.
It’s also important to take your time and be certain that the edge of your tape is in tight contact with the surface so that the varnish can’t creep under the tape. You can use a plastic spreader to help seat that edge of the tape down tight, or you can use a technique called “burnishing.” Using a 3M Scotch-Brite pad, rub the edge of the tape down with heavy pressure, being careful not to scratch the painted surface with the pad. Make sure that the edge where the varnish meets the paint is straight and even, so you get coverage but don’t get any varnish on the paint that you’ll have to clean off later. A straight edge creates an attractive, clean contrast. Typically, you can get three to four coats of varnish on before you have to pull the tape and re-tape if it’s not too thick. If you get too many coats on the tape, when you go to take it off, it will pull some of your topcoats with it.
Surface Prep
Once the taping is done, we use high-quality 3M Stikit Gold disc roll sandpaper. We get it at the boatyard in roll form. The roll can be used on our disc machines, and it’s easy to fold and keep together, and, with its adhesive backing, it’s also easy to use by hand. Select the appropriate grit (80 to 400) for the surface and for where you are during the job. It is typically recommended to start with a lower number (more aggressive grit) and then work your way up to the higher, less-aggressive grits.
Focus on sanding the area evenly and uniformly. Remember, you want to scratch the surface for adhesion, not sand away what you have put on, and if you are working on a flat surface, a 3M sanding block, used to keep things level, is a huge help. When you’re building up coats, you can use 3M Scotch-Brite green pads to lightly scratch the surface so that you don’t remove what you’re putting on by sanding too hard. To get into the tight places and sand the edges so the material sticks, use a plastic putty spreader or other hand tool, especially if you have the adhesive-backed paper to stick to the spreader as you sand. You also need to be careful not to sand too hard and “burn” through the varnish on the edges and corners. It is important to maintain ample varnish buildup on these areas for longer-lasting protection.
Once you have taped and sanded and are ready to apply a new coat, you first need to prepare the area by removing all the dust. If you can, use clean air
from a compressor to blow the area off; then wipe it with a clean rag and either Interlux 216 or Interlux 333 if you’re using Schooner. Denatured alcohol will also work. Be sure to change the rag as soon as it gets soiled so that you are not just moving the dust from one place to the next.
Just prior to brushing, the area that will be coated should be wiped with a good-quality tack cloth to remove any more surface dust. Be careful not to apply too much pressure when using the tack cloth — you might leave a residue on the surface that you are about to varnish. Before you apply the final coats, it is also a good idea to remove the tape, soap and chamois the entire boat to remove any dust and dirt that may blow into your work, and then re-tape, wipe with denatured alcohol and the tack cloth, and start brushing.
Brushes
It is very important to use high-quality brushes for your varnish work. The pros I know use Corona Europa soft badger-style pure China bristle brushes with an extrafine tip that helps the varnish flow. It is recommended to use a new brush — that you clean prior to use — for building coats. Use another new brush (again, that you clean prior to use) for your final coats so that you are not introducing particulates from your used brushes into your clean varnish pot.
It is important to clean your brushes thoroughly between buildup coats and keep them as clean as possible. Also, keep the buildup brush and the final-coat brushes separated. Always use clean pots for each coat, and strain the product out of the can so that you do not get any foreign matter from the can into your brush pot.
Products
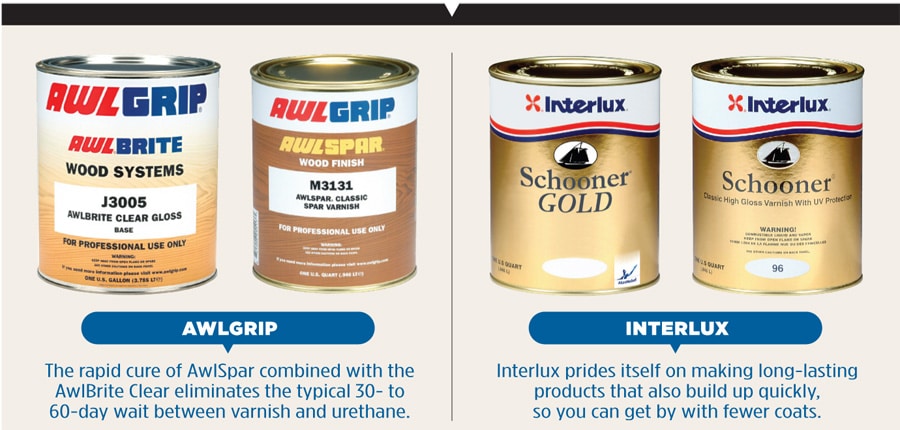
When starting to coat on bare wood, it’s good to use a recommended thinner or Interlux Interprime Wood Sealer so that it soaks into the wood and seals it well. Manufacturers recommend a first coat thinned 25 percent for good penetration. Once you have a couple of sealer coats, it’s time to build up. If you’re short on time, you can use quick-build products, such as AwlBrite Clear over thinned AwlSpar varnish; however, it has been our experience that, over time, the clear product will lighten and turn your varnish yellow. AwlBrite Clear is a three-part acrylic urethane that requires mixing and is recommended for professional use. It does cure faster and has a bit longer life.
We prefer to use straight varnish, such as Interlux Schooner 96, for several reasons. First, it gives the wood a traditional-looking, natural deep-golden color and maintains that color over time, because it has ultraviolet filters. Second, it flows out nicely with self-leveling properties for a straight, high-gloss finish. Finally, if you do get a ding or a scratch in it, it’s easier to repair and match, whereas with the three-part product, you have to repair it with regular varnish first and then overcoat with the AwlBrite, which leaves a noticeable repair due to the color change from sun lightening.
Once you get a system down and work with it a bit, you will find that keeping your varnish is not as big a deal as you may have thought.
LINKS
www.cornonabrushes.com
www.3m.com
www.yachtpaint.com
www.awlgrip.com


