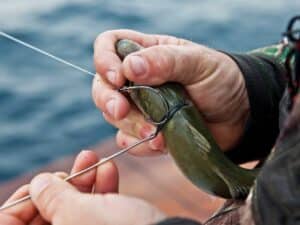
While some crews still prefer to run double hook-sets in their lures, I think you get a better hookup, and a much safer release at boat-side, with a single hook running as far back in the skirts as the IGFA allows (the eye of the hook has to be inside the skirt). Trying to release a struggling blue marlin alongside the boat with a free-swinging hook attached to the fish is not my idea of a fun time! Here’s how I make my heavy-tackle single-hook rigs.
**1. **
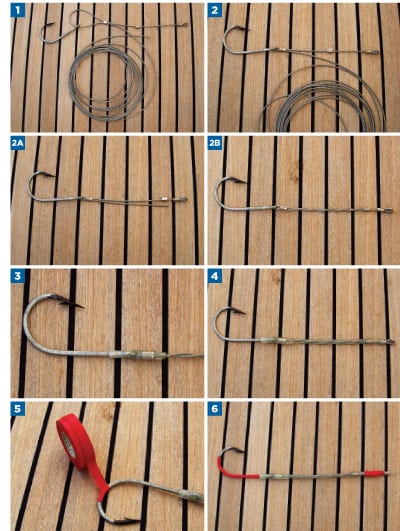
Starting with 8 to 12 feet of cable, slide a sleeve on one end and crimp a loop using a stainless thimble. Use the needle-nose pliers to help close the open gap in the thimble end.
2. Slide two more sleeves and the hook onto the bitter end of the cable. Run the cable end through the sleeve closest to the hook, and pull the remaining cable through until you have the desired length of your hook-set. Crimp the sleeve at the hook. (2A) Cut the remaining cable off, just short of the crimp at the loop end of the rig. Run the cable end through the second sleeve and position the sleeve in the crimping tool. Hold the tool in one hand, and use your other hand to hold the hook and twist the cable stands around each other until they become tight at the sleeve; then crimp the sleeve. (2B) Be sure to keep the two strands of cable even and tight. I also try to line up the sleeves and cable ends when crimping the second sleeve to keep the rig streamlined.
By using a long length of cable, you can make up several hook-sets without wasting any cable until you reach the final end of the cable. It is also easier to adjust the rig length when crimping the hook end and then cutting the cable to **
**the proper length near the loop end.
3. Cut a piece of heat shrink long enough to cover the hook-eye-crimped loop, and then shrink down. This short piece makes the rig stiffer.
4. Cut a length of heat shrink to cover the rig from the loop end to a little past the hook eye and then shrink down. If you can’t get heavy-wall heat shrink, you may need to use a second layer of heat shrink to get the desired stiffness of the rig. I also like to use clear heat shrink so I can see if rust or corrosion starts to develop under the heat shrink. With a little bit of care, I can get a couple of seasons out of my rigs.
5. Sharpen the hook, if you haven’t already, and paint the point with permanent marker to prevent rusting. Using a roll of vinyl electrical tape that’s been split in half to make it narrower, tape the hook starting at the middle of the bend, wrapping toward the hook eye, overlapping each wrap and pulling the tape tight as you go. Finish off at the hook eye with a few wraps and cut the tape to keep it from unwrapping. I like to use a bright-colored tape on the hook to help see where the hook is in the fish’s mouth, back or wherever, when fighting a fish.
6. Crimp your leader to the hook-set using a stainless thimble in the mono loop. Holding the hook-set tight, use the same split roll of tape to tape over the cable loop and mono loop connection. Put on several layers of tape to make sure the connection is stiff. Don’t wrap the tape onto the crimp on the mono leader if you are using the rubber plugs found on the backs of some lures to lock the hook-set into position.